Friday, December 8, 2017

FREE CHRISTMAS SNOWFLAKE CROSS STITCH ORNAMENT PATTERN

Each Christmas, I made a bunch of cross stitched ornaments for my friends. I've made everything from little Christmas Tree to the Apple logo. This year I created a snowflake design.

This was the result and it came out super cute! I really like this design but decided that I wasn't going to put for sale on my Etsy shop because it was too similar to other patterns out there. Instead I just decided to give it away for FREE! Pattern is below :) I hope you like it.

Wednesday, September 27, 2017

DIY Hogwarts Themed Party - Overview and Invite


Recently I celebrated my birthday and my friends and I decided to have a Hogwarts themed party. We spent a lot of time prepping and it came off splendidly. Not wanting it to be forgotten, I've posted everything here so that others having a similar party would be able to benefit from all our hard work.

I've made step-by-step instructions with pictures for a complete DIY guide and free printables. On this post you will find the instructions for making an invite. There are links at the bottom of the post to DIY sorting hat activities, games, chocolate frogs, golden chocolate snitches, butterbeer, enchanted ceiling, platform 9 ¾, floo network, ministry of magic, third-floor corridor, and Hogwarts Banners.


Dear Friends,

We are please to inform you that you have been accepted to Hogwarts School of Witchcraft and Wizardry for a celebration 
of [insert event here]. Please join us at [insert time] On [insert date] At [insert location]
Traditional wizarding robes are appropriate but not mandatory. We await your owl post RSVP. If you must, you may use muggle methods of contact via text [insert phone number] or Facebook event notification.
Yours Sincerely,
[Insert Name of Hostess]
Deputy Headmistress

Feel free to use the text above and the image below to create your own invites. Be sure to use green ink and a script like font for the lettering. I used Luminari for the invite I created. Simply copy the image below and paste it into a word/pages document and then use a text box to add the text on top. 
Harry stretched out his hand at last to take the yellowish envelop, addressed in emerald green to Mr. H. Potter, The Floor, Hut-on-the-Rock, The Sea. He pulled out the letter and read:
HOGWARTS SCHOOL 

of WITCHCRAFT and WIZARDRY

Headmaster: ALBUS DUMBLEDORE
(Order of Merlin, First Class, Grand Sorc., Chf. Warlock, 

Supreme Mugwump, International Confed. of Wizards)
Dear Mr. Potter,
     We are please to inform you that you have been accepted to Hogwarts School of Witchcraft and Wizardry. Please fined enclosed a list of all necessary books and equipment.
     Term begins on September 1. We await your owl by no later than July 31.
Yours Sincerely,
Minerva McGonagall
Deputy Headmistress
(Harry Potter and the Philospher's Stone, 51)

LINKS TO THE REST OF THE PARTY


DIY Hogwarts Themed Party - Banners


Full Disclosure, when I started making these banners I had something much more simple in mind. And then I went a little overboard and made it waaaayyyy too complicated. Either way, they turned out great and I'll be as detailed as I can in describing how I made them. However, keep in mind that these end up being a bit of a time suck.

You will need:
  • Fabric: Red, Green, Yellow, & Blue (approximately 1 foot of each)
  • Felt: Golden Yellow, Silvery Gray, Black, & Bronze-Brown (two pieces of each)
  • Thread to match both the fabric and the felt
  • Embroidery Floss
  • Wooden Dowel (4)
  • Twine
  • Scissors
  • Sewing machine 
  • Pins
  • Printer
  • Iron
Each step is repeated for each banner

STEP ONE:

You shouldn't need to cut the fabric if you purchased just a foot of each. Using a piece of 8.5 x 11 cardstock as a guide, fold and iron the rough edges of the fabric over the paper so you have a long rectangle approximately 11 x 44 inches. Sew a seam on the edges on each side with matching thread leaving a quarter inch between your straight stitch and the edge of the fabric. Then cut a triangle, approximately 5 inches tall, out of the bottom of your fabric. Make sure to leave enough fabric to allow for seams. Fold over the edges, iron, and sew. 

STEP TWO:

Measuring 7.5 inches above your bottom seam, using the contrasting color thread, sew lines parallel to the top two legs of your triangle. It helps to iron a crease in the center of your fabric, at this point. You can iron it out once your project is finished.

STEP THREE:

Cut out a bunch of diamonds in the contrasting felt color. These diamonds are about 1.25 inches across and 2.5 inches tall. Use image below to print out and cut diamonds from the felt. You will need 28 diamonds
STEP FOUR:
Once you have your felt diamonds, take your first diamond and line it up so the top is touching the sewn line from step two and the edge is touching the center line of the fabric. Start sewing a vertical line through the diamond and add another diamond when you have just about sewn through the first diamond, repeat with the third diamond. Then add columns of diamonds, lining them up with the diamond pattern and sewing through them vertically. Once you have your 8 columns of diamonds. Sew across them horizontally so that the edges of each diamond are touch the diamond in the column next to it. Then using the same contrasting thread that matches the felt, sew all the way around your chevron shaped polygon. Trim off excess felt from diamonds that had over-lapped the seams. 


STEP FIVE:
Printing out the images below so they are all about 7.75 inches tall (except the snake, make that one a little smaller). Pin images to contrasting felt color and cut out. 

Eagle (Bronze on Blue)

Badger (Black on Yellow)
Lion (Gold on Red)
Snake (Silver on Green)
Front & Back view of sewn felt snake.
STEP SIX:
Take the cut out of each of the animals and place them on their respective flags approximately 14.25 inches above the tip of the diamond polygon. Center and pin to fabric. Sew onto flag.


Your flags should be looking something like this
STEP SEVEN:
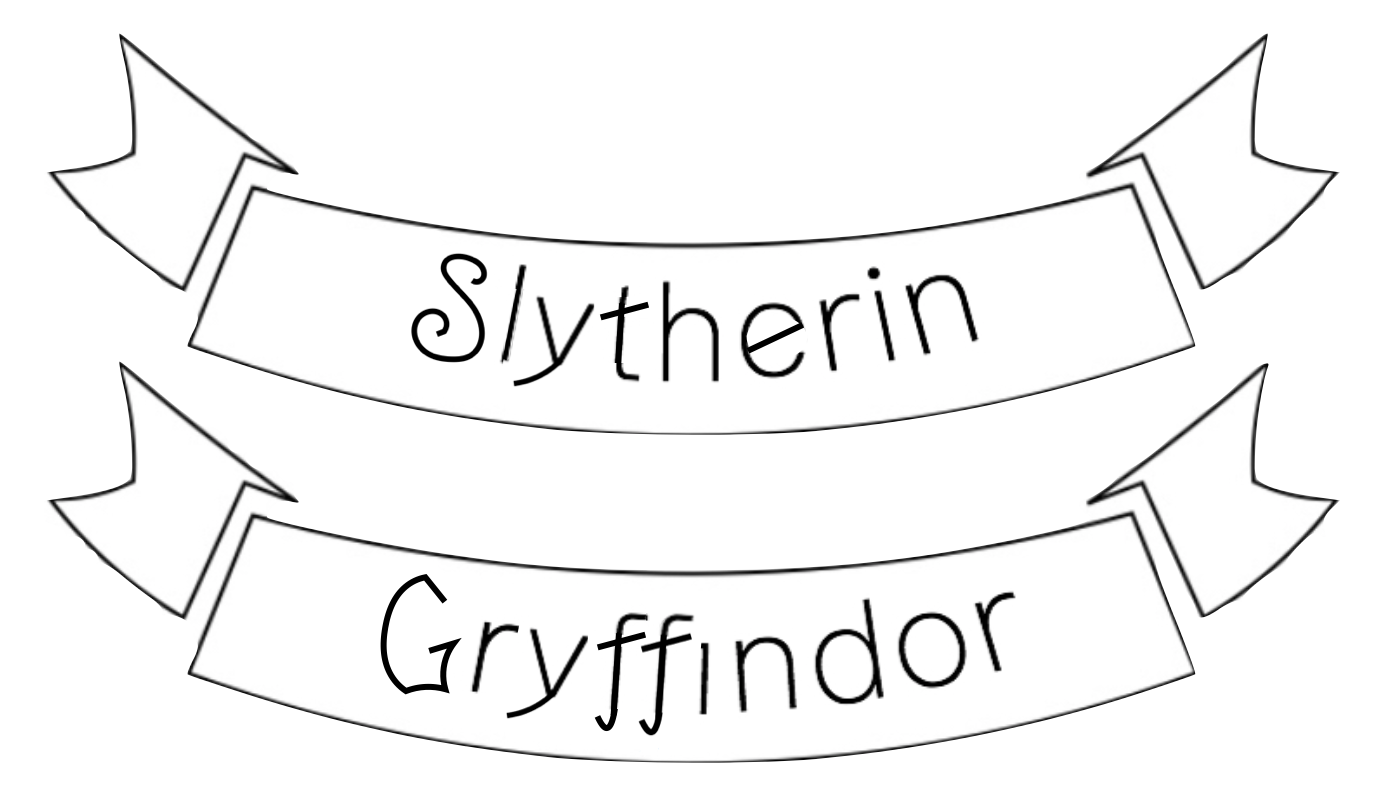
Print out the images below so each ribbon measures 9 inches across. Pin images to felt but don't cut out yet. Using 3 strands of embroidery floss that matches the fabric (not the felt) trace the lettering with stitches. Once the lettering is complete, cut out the shape of the ribbon in one piece. Do not cut the ends of the ribbon away from the body of the ribbon. Now take the paper and carefully rip it off of the felt and out from underneath the stitches.


 The picture to the left shows the first 3 ribbons have been completed and cut from the felt and the Slytherin ribbon is in the process of being stitched. 


STEP EIGHT:
Take the cut out felt of each of the ribbons and place them on their respective flags approximately 11 inches above the tip of the diamond polygon. Center and pin to fabric. Sew onto flag, stitching along the felt in the same pattern as the lines on the pattern, only slightly indented. Make sure to leave space between the lines of stitching for the folds. Once stitching is complete, carefully cut the fold spaces from the felt.


STEP NINE:
Fold the top edge of the flag over and back at least 1.5 inches, but match up to your other flags to ensure that they are the same length. Then sew a seam along the top edge about an inch down. Insert wooden dowel and tie a short length of twine to each end of the dowel.


STEP TEN:
Hang your banners and step back and appreciate all your hard work.


LINKS TO THE REST OF THE PARTY


DIY Hogwarts Themed Party - Activities

Activities are an important part of any party. First start by sorting each guest into one of the four houses. Next let them sit around eating and chatting. Use this opportunity to take pictures and make use of your photo station. End the night with a hilarious game of Hogwarts themed game of charades, pictionary, or five nouns.


When attending a wizarding party, most attendees will already have a house to which they are aligned. Don't try and force a sorting. Simply have your sorting hat out with house stickers.

SORTING HAT

On top of the stool she [Professor McGonagall] put a pointed wizard's hat. This hat was patched and frayed and extremely dirty... For a few seconds, there was complete silence. Then the hat twitched. A rip near the brim pend wide like a mouth -- and the hat began to sing: (Harry Potter and the Philosopher's Stone, 117) 

I used an plastic container I had sitting around to make a Sorting Hat. I covered the label by gluing on the print out (below). It is about 7 x 3.5 inches. One side reads, "Choose Your House" and "Wear & Display Your Badge with Pride." The other side is the Sorting Hat Song.


Using full sheet sticker paper, make your own house badges and place them into the container along with markers, if your guests wish to color. Simply copy and paste the images below to a word/pages document and print :) 


A mistake I have made before is to have too many activities planned for a party. So you can get by by only playing one game. The word list below is good for playing a number of games such as charades or pictionary. Right click to open image in a new tab and print :)  At my party we played a game called 5 nouns (it's my favorite). It's really easy and this is how it is done:
  • Ordinarily, this game is played by having everyone write down 5 nouns and place it into a hat. For my party, I wrote down the nouns ahead of time. 
  • Split into two teams. Each team gets a turn for one minute. In that one minute a player takes a turn trying to get their team to guess the noun. 1 point per noun.
  • Round One is like the game Taboo. You have to get your team to guess as many nouns as possible by describing them without using the noun itself. Teams take turns guessing until all the nouns have been guessed. 
  • Round Two using the same set of nouns, time limit, etc. the players have to get their team to guess the noun by using only 1 word. Seems difficult, but remember that everyone has heard the words at least once during Round One.
  • Round Three is the same as Round Two but now it's charades. No words or sounds, just acting out the nouns. Lots of fun. Hilarious.  


LINKS TO THE REST OF THE PARTY

DIY Hogwarts Themed Party - Food


There was a variety of food at my party. We had a feast of food that was befitting the Great Hall at Hogwarts. We had delicious beef roast with mashed potatoes and gravy. There were also roasted vegetables (corn) and savory scones (cheddar bay biscuits).  But most of the effort went into making the sweets.


"What are these?" Harry asked Ron, holding up a pack of Chocolate Frogs. "They're not really frogs, are they?" He was starting to feel that nothing would surprise him. (Harry Potter and the Philosopher's Stone, 102)

You can easily make these with this chocolate candy mold. Mix together two bags of milk chocolate chips and one bag of white chocolate chips in a bowl. Then using a glass measuring cup, melt about a cup of chocolate at a time in the microwave (15-30 second increments). Once the chocolate is melted, pour into the molds and tap on the counter to fill in gaps and release air bubbles. Use a bowl scrapper to scrap off excess chocolate and then place mold into freezer.  Once the chocolate has hardened, flip mold over and tap out onto clean surface.


Wood reached into the crate and took out the fourth and last ball. Compared with the Quaffle and the Bludgers, it was tiny, about the size of a large walnut. It was bright gold and had little fluttering silver wings.
"This," said Wood, "is the Golden Snitch, and it's the most important ball of the lot." (Harry Potter and the Philosopher's Stone, 169)

These Snitches are super easy to make. Buy the biggest thing of Ferrero Rocher you can find. Print out the image below as many times as you need it. Place all copies of the wings together in a pile and use an Xacto knife to cut through the multiple layers at once. This way you only have to cut out 8 sets of wings. Once your wings are cut, remove the Ferrero Rocher sticker and use it to attach the wings to the gold wrapper.


Ron came back five minutes later, carrying three foaming tankards of hot butter beer.
"Merry Christmas!" he said happily, raising his tankard.
Harry drank deeply. It was the most delicious thing he'd ever tasted and seemed to heat every bit of him from the inside. (Harry Potter and the Prisoner of Azkaban, 201)

Butterbeer is super easy to make: a 2 liter of A&W cream soda, a tablespoon of each butterscotch, butter, and rum flavoring. Adjust to taste. Add whipped topping if desired. Place in large ornate silver pitcher you have laying around or pre-pour into mugs.

Here is an image you can use for making the food label cards. Center and place at bottom of word/pages document and print on cardstock.


LINKS TO THE REST OF THE PARTY

 DIY Hogwarts Themed Party - Banners 

DIY Hogwarts Themed Party - Enchanted Ceiling


The enchanted ceiling is by far what I got complimented on the most at my party, especially the floating candles.


Harry had never even imagined such a strange and splendid place. It was lit by thousands and thousands of candles that we floating in midair over four long tables ... Mainly to avoid al the starting eyes, Harry looked upward and saw a velvety clack ceiling dotted with starts. He heard Hermione whisper, "It's bewitched to look like the sky outside. I read about it in Hogwarts, A History." (Harry Potter and the Philosopher's Stone, 116-117) 

The night's sky on the ceiling was a bit tricky to pull off, and I'm sure we could've done a better job of getting more of the ceiling covered if I had more time to fool around with the projector. We had recently bought a projector from Amazon and what better way to use it than for my party? Using this video from Youtube and zooming in a bit, you have a night's sky. Simply set up the projector up at an angle so it will project on the ceiling.

The candles were actually quite easy, just time consuming.

First, get all the empty toilet paper rolls and paper towel rolls from around your house. You might need to save them up for a while. Paint the inside and the outside white.

Then using some LED tea light candles you can purchase online, hot glued them in at the top end of each roll. The bottom end of the rolls needed to remain open so you can access the switch at the bottom of tea light.  Once the light is in place, add hot glue dribbles down the sides to make it look more like a real wax candle.

Hanging the candles is done by poking two holes on each side of the roll, about an inch down. Then using approximately 30 inches of clear fishing line, place each end through the holes, pull it down out the bottom of the roll, tie a knot, and this creates a large loop. After it is knotted, pull the fishing line back up and tie a knot as close to the wick of the candle as possible. This prevents the candle from tilting too much since it is top heavy. Use the remaining fishing line loop to wrap around a push pin and place in the ceiling.


LINKS TO THE REST OF THE PARTY

 DIY Hogwarts Themed Party - Banners 


DIY Hogwarts Themed Party - Platform 9 3/4


Themed parties always need a good photo station. And what makes a better station than King's Cross Station, Platform Nine and Three-Quarters?


The first thing you will need is a brick wall. I purchased this Brick Wall Backdrop 4ft. x 30ft. from Amazon. It worked great and I had plenty of left over plastic that I could've made an entrance to Diagon Alley as well. I did need to cut two pieces to make my wall since it is only 4 ft tall and I pinned one above the other. Sadly, I forgot to take a picture of just the wall and so here's a picture of the wall with the image of the Hogwarts train photoshopped on top to cover the rest of the image; the rest of the image being my friends taking silly photos.


A scarlet stream engine was waiting next to a platform packed with people. A sign overhead said Hogwarts Express, eleven o'clock. Harry looked behind him and saw a wrought-iron archway where the barrier had been, with the words Platform Nine and Three-Quarters on it. He had done it. (Harry Potter and the Philosopher's Stone, 93-94)


Next is the Platform 9 ¾ hanging sign. You will need:

  • Cardboard (just used any old box lying around)
  • Black, Rusty Red, and Golden Yellow paint
  • Hot glue
  • Xacto Knife 
  • ¾ printout

  1. Size the above image to approximately 10 x 4 inches and print out twice. If you have a color printer, great; if not, you can paint the red background and the gold letters. 
  2. Cut out the following pieces of cardboard:
    • One 11 x 5 inch rectangle for the backing 
    • Two 11 x 5 inch rectangles with 9.5 x 3.5 inch cut out to create 0.75 inch frames
    • Two 10.5 x 0.75 inch strips
    • One 12 x 0.75 inch strip

  3. Center and glue the printouts to each side of the backing.
  4. Paint the frames gold and the strips black.
  5. Glue frames on each side of the sign.
  6. Paint edges of the sign gold.
  7. As evenly as possible, fold one of the short strips around the left edge of the sign and glue.
  8. Glue second short strip to the back of the first, making sure to leave 0.75 inch hanging below the end of the sign
  9. Take the long strip and curl one end as tight as you can.
  10. Glue the uncurled end of the long strip just below the top of the vertical short strip and glue the bottom part of the curl to the end of the fold short strip. 

I painted my sign red and gold and so I had the same gold to paint the frame. Obviously, I should've used a ruler to cut straight edges for the frames but I think it turned out pretty well, all things considered.

Place your photo booth props and some antique suitcases next to your wall and you've got yourself your very own Hogwarts Express Platform!


LINKS TO THE REST OF THE PARTY
http://misadventuresofmisskay.blogspot.com/2017/09/diy-hogwarts-themed-party-banners.html
http://misadventuresofmisskay.blogspot.com/2017/09/diy-hogwarts-themed-party-activities.html
http://misadventuresofmisskay.blogspot.com/2017/09/diy-hogwarts-themed-party-food.html
http://misadventuresofmisskay.blogspot.com/2017/09/diy-hogwarts-themed-party-enchanted.html
http://misadventuresofmisskay.blogspot.com/2017/09/diy-hogwarts-themed-party-platform-9-34.html
http://misadventuresofmisskay.blogspot.com/2017/09/diy-hogwarts-themed-party-signs.html

http://misadventuresofmisskay.blogspot.com/2017/09/diy-hogwarts-themed-party-invite-and.html

Translate

Followers